Docker配置WireGuard服务端及多种客户端实践

使用WireGuard将不同地区的局域网或设备连接起来, 组成一个内部虚拟专用网络; 增加Tailscale方案
背景
WireGuard 是一种现代、快速且安全的虚拟专用网络 (VPN) 通信协议和免费开源软件。
WireGuard 的设计目标在于易于使用、高速性能和低攻击面。它利用了最新的加密技术,旨在提供比 IPsec 和 OpenVPN 等传统 VPN 协议更好的性能和更强大的功能。WireGuard 的核心代码相对精简,被 Linux 之父 Linus Torvalds 称为 艺术品,其核心代码只有四千多行。
此外,WireGuard 协议通过 UDP 传递流量,使其在速度和安全性方面具有显著优势。它被设计为简单、高效,并适用于从低端设备如树莓派到高端服务器的广泛环境。
有什么用
Wireguard 回家
学会配置WireGuard这种VPN‘回家’的方式,
主要用于在外办公方便VPN 回家的使用场景. 下一步博主就要在 macOS, Android 和 K2P 上体验
公网服务器上部署一个Wireguard 服务器,然后让Openwrt 通过Wireguard 连接到公网服务器,然后客户端可以通过Wireguard 访问Openwrt 的内网设备。
硬件
本例子中使用了
[done] NAS中docker一个WireGuard Easy服务端
主路由为OpenWrt的情况, 作为远程VPN的服务端
- 这样外出的电脑和手机等就可以通过这个WireGuard将数据VPN回主路由OpenWrt的物理位置
- 设置繁琐, 放弃该方案
[done]客户端一: MAC OS 电脑作为一个WireGuard客户端接入VPN网络
- 成功
客户端二: K2P作为一个WireGuard客户端接入VPN网络
- 待续, 需要特定的固件
[done]客户端三: 安卓手机作为WireGuard客户端接入VPN网络
- 成功
客户端四: OpenWrt作为WireGuard客户端接入VPN网络
新增章节Tailscale
未完待续….
相关内容
实现方法
OpenWRT创建公钥私钥
预共享密钥
通过SSH登陆到 OpenWRT 后台.
1 | mkdir wg |
服务端公钥私钥
1 | wg genkey | tee server_privatekey | wg pubkey > server_publickey |
MacOS 客户端公钥
客户端公钥私钥 ( macOS )
重复此操作创建每个客户端的公钥和私钥,请注意修改以下命令中的文件名,本文以 macOS 为例:
1 | wg genkey | tee macos_privatekey | wg pubkey > macos_publickey |
运行发现报错:
1 | zsh: command not found: wg |
解决:
1 | # 在线安装wireguard |
配置 OpenWRT UI
服务端相关配置
登陆 OpenWRT - 网络 - 接口 - 添加新接口

基本设置 - 填写上文获取的服务端私钥
自行填写一个端口号 - 并且在路由器映射该端口的 UDP 协议
IP 地址填写一个 VPN 专用的网段 IP - 本文以192.168.100.X为 WireGuard 的专用网段为例,则本 WG 服务器 IP 为192.168.100.1/24
防火墙设置 - 选择 vpn
客户端 Peers 区域为每个客户端添加配置

选择预共享密钥 - 添加
公钥 - 填写上文获取的macOS 客户端公钥;
- 新的客户端, 正在尝试, 直接点击 “生成新的密钥对”进行新的客户端Peer的公钥和私钥生成.
预共享密钥 - 填写上文获取的预共享密钥
允许的 IP - 即表示为此 macOS 客户端分配固定 IP , 本文示例为 192.168.100.2/32 , 注意各客户端 IP 不能冲突.
持续 Keep-Alive - 填写 25
防火墙
网络 - 防火墙 - 自定义防火墙 - 添加以下防火墙 - 重启防火墙
1 | iptables -t nat -A POSTROUTING -s 192.168.100.0/24 -o br-lan -j MASQUERADE |
再次声明博主的 OpenWRT 是作为旁路由接入,此条防火墙不确定适用于主路由部署 WireGuard 使用.主路由用户可以尝试无需设置防火墙(经朋友测试)
配置了一圈防火墙的规则, 还是卡死
1 | nc -vz wg.carlzeng.com 51820 |

好像又有在OpenWrt的远程服务端收到数据包, 可是又不知道最终效果是如何的?
比如从什么应用出发? 连接了WireGuard VPN以后效果是如何的?
是可以直接ping通的, 比如 ping 10.8.0.5
重启 WireGuard
返回网络 - 接口 - 关闭 - 连接
或者直接重启整个 OpenWRT 最为稳妥.
客户端(MAC)
创建客户端配置文件
创建后缀为.conf的配置文件,例如macos_wireguard.conf,复制以下信息,并且修改对应的公私钥信息:
1 | [Interface] |
此时的配置文件是用于客户端的,所以PrivateKey则为 macOS 客户端的私钥,而Peer中的PublicKey则为 OpenWRT 的公钥.请注意反向思考,Endpoint填写家中的 IP 或者 DDNS 域名和端口.
AllowedIPs
值得注意的是AllowedIPs参数.针对不同场景和需求,此处可以配置不用的路由.
当此处为0.0.0.0/0时表示任意网络请求都经过 VPN 俗称全局 VPN , 由于 iPhone 同时只能有 1 个 VPN 软件在线,所以当 WireGuard 启动时,其他类似Quanx,小火箭等软件则无法使用,此时 iPhone 可以全局 VPN 使用家中的网络来访问一些外网.
如果是 macOS 或 Windows 客户端,WireGuard和Clash等软件可以共存,此处可以设置为AllowedIPs = 192.168.1.0/24, 192.168.100.0/24,表示访问内网网段才会走 VPN .而其他互联网,外网等访问还是走当前网络来利用Clash分流.
macOS
在 macOS App Store 下载 WireGuard,从文件导入隧道.
在 OpenWRT 状态页面能够看到连接成功的状态信息
其他命令
wg-quick down wg0 #停止服务
wg-quick strip wg0 #查看配置
wg-quick #查看所有支持的命令
群晖安装 WireGuard 客户端
WireGuard 官方提供了很多系统的客户端,但是群晖暂时还没有,有开发者打包了对应的安装包,但是 DSM 7.0 中,群晖插件机制有改动,造成无法简单安装使用。
一、在套件中心添加“我不是矿神”套件源
名称随意,位置填 https://spk7.imnks.com/ 然后确定
二、安装Wireguard套件

1、切换到root用户
sudo -i
2、赋予Wireguard套件权限(执行该命令后启动Wireguard套件已经不会自动停用)
sudo sed -i 's/package/root/g' /var/packages/WireGuard/conf/privilege
3、在etc目录下创建wireguard文件夹
mkdir /etc/wireguard/
4、编辑Wireguard配置文件
vi /etc/wireguard/wg0.conf
5、进行相关配置
(1)、按下” i “键进行编辑,复制本地编辑好的配置文件内容,鼠标右键直接粘贴
注意:要将DNS那行删掉
实例的NAS中wg0.conf配置文件
1 | [Interface] |
要小心,这个地方配置文件中的设置;
要和OpenWrt中的Peer设置不一样的, OpenWrt中的Peer设置要填写下吗这些wg genkey 生成的NAS中的公钥和私钥.
1 | wg genkey | tee nas_privatekey | wg pubkey > nas_publickey |
[已解决]故障: MAC端的peer ( sudo wg show wg0) 可以看到输出; 但是 NAS这样的配置 同样运行( sudo wg show wg0)是无法看到peer的输出的
一顿操作, 修改了配置文件后: 主要是
- ssh中的vi wg0.conf
- OpenWrt中设置/添加相应的Peer
1 | root@DS918:/etc/wireguard# wg show wg0 |
1 | carlzeng@Carls-MBP AppTesting % sudo wg show |
[下一步]K2P作为一个WireGuard客户端接入VPN网络
固件: https://www.right.com.cn/FORUM/thread-8001722-1-1.html
WireGuard client for routers with Padavan based firmware
这个应用的实用性强, 应用广泛. 可目前缺少时间实践刷固件测试, 排队等待下一步执行…
OpenWrt作为WireGuard客户端接入VPN网络
OpenWrt安装
1 | wg-quick |
1 | opkg install wireguard-tools |
原来直接在UI上可以直接设置(导入配置文件), 不需要使用wg-quick命令

抱歉我目前无法做这个测试, 我不能把当前的主路由OpenWrt拿来配置WG 客户端 否者担心流量会走入一个错误的循环, 具体参考:
https://www.youtube.com/watch?v=0_zQAp3V18c
故障及排查解决
mac端也是; transfer: 0 B received, 有 sent

6、启动刚才编辑好的配置(启动Wireguard套件后在执行)
sudo wg-quick up wg0
7、查看连接状态
sudo wg show wg0
解决思路: 切换OpenWrt的服务端 到 docker服务器中, 这样简化了整个设置/配置过程.
NAS中运行wg-quick错误
/usr/local/bin/wg-quick: line 32: resolvconf: command not found
1 | wg-quick up HBY_NAS |
just install it with apt-get install resolvconf and reboot, or comment out all DNS fields in configuration file
1 | sudo wg-quick up HBY_NAS |
通过如下设置, 关闭NAS的IPv6

1 | wg-quick up HBY_NAS |
截至目前, 仍然无法给NAS开启WireGuard客户端, 暂时放弃, 因为它也是WireGuard服务器所在的docker容器也在NAS中.
docker搭建WireGuard服务端
状态实时查看界面: http://192.168.6.203:51821/
docker-compose.yml
1 | volumes: |
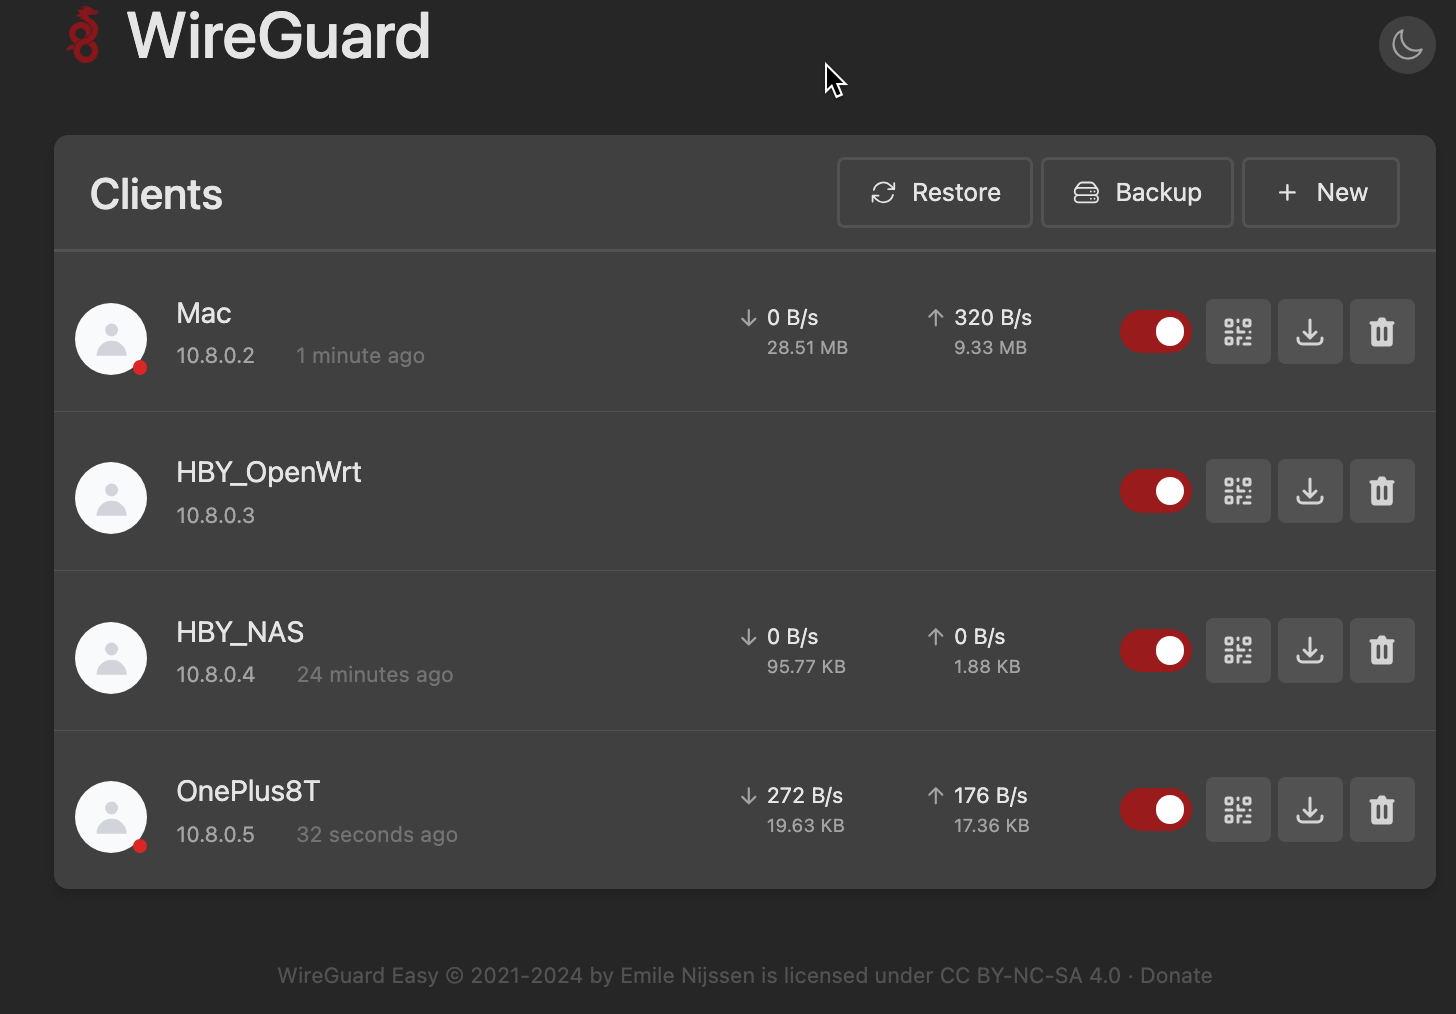
如本文第一章照片所示, 这个工具很人性化, 整个设置非常简便, 节省时间.
Tailscale的VPN方案
优点: 安卓的流量全部走远程的服务器, 各个APP都会识别远程的IP(比如 闲鱼 等会识别远程的IP和位置)
注册tailscale建议使用Hotmail/Outlook的微软账号.
设置到旁路由, 或者主路由
1 | mkdir tun && mkdir lib |
设置在Tailscale的Access Control 里面
1 | { |
生成密钥的页面:

这个密钥就是用在docker-compose中的密钥
原来这个密钥已写明了有效截止日期, 定期要手动更新的(每次新建最长90天, 三个月), 原来是这样的设计….
Android客户端
下载安卓客户端文件安装, 比如: tailscale-android-universal-1.84.0.apk
下载地址: https://pkgs.tailscale.com/stable/#macos
安装后登录;
然后自动就连接上了(会要求在本机 新建一个文件夹)
开启连接成功后, VPN显示建立成功
MAC OS客户端
被这个卡死: Change security settings on the startup disk of a Mac with Apple silicon
Change security settings on the startup disk of a Mac with Apple silicon
显示应用场景/背景
本地用Windows笔记本或者游戏的主机
用一台淘汰的Windows主机, 安装双网口的网卡, 一个做LAN, 另一个做WAN;
然后这台Windows用作软路由, 用Hyper安装OpenWrt的虚拟机, 用来把WAN口拨号, Lan口转接到交换机或者旁路由
故障排除troubleshooting tailscale
手机安卓客户端打开app后, 可以正常登录但是图标处显示, 有可用更新, 然后‘ EXIT NODE’显示为None, 导致服务不可用; 如何排查?
打开检查账号
- 终于使用outlook的oAuth2.0登录的https://login.tailscale.com/admin/machines
- 查看到machines中只有手机, 那么就是docker的没有在线了?
查看docker状态
默认是了117的服务器
docker ps 检查到tailscale没有运行
启动报错:
1
2
3
4
5
6
7
8
9
10
11
12
13
14
15
16
17
18
19
20
21
22
23
24
25
26
27ailscale | 2026/02/09 12:54:32 Start
tailscale | 2026/02/09 12:54:32 ipnext: active extensions: relayserver, taildrop
tailscale | 2026/02/09 12:54:32 Backend: logs: be:a4ce375033a842278b8c3192b6f707c3f2033d23a87fa7d1a1fbc9531b33d378 fe:
tailscale | 2026/02/09 12:54:32 control: client.Login(0)
tailscale | 2026/02/09 12:54:32 health(warnable=warming-up): error: Tailscale is starting. Please wait.
tailscale | 2026/02/09 12:54:32 control: doLogin(regen=false, hasUrl=false)
tailscale | boot: 2026/02/09 12:54:33 [warning] failed to symlink socket: file exists
tailscale | To interact with the Tailscale CLI please use `tailscale --socket="/tmp/tailscaled.sock"`
tailscale | boot: 2026/02/09 12:54:33 Running 'tailscale up'
tailscale | 2026/02/09 12:54:33 Start
tailscale | 2026/02/09 12:54:33 Backend: logs: be:a4ce375033a842278b8c3192b6f707c3f2033d23a87fa7d1a1fbc9531b33d378 fe:
tailscale | 2026/02/09 12:54:33 control: client.Login(0)
tailscale | 2026/02/09 12:54:33 control: client.Shutdown ...
tailscale | 2026/02/09 12:54:33 control: mapRoutine: exiting
tailscale | 2026/02/09 12:54:33 control: authRoutine: exiting
tailscale | 2026/02/09 12:54:33 health(warnable=login-state): error: You are logged out. The last login error was: fetc
h control key: Get "https://controlplane.tailscale.com/key?v=116": context canceled
tailscale | 2026/02/09 12:54:33 control: updateRoutine: exiting
tailscale | 2026/02/09 12:54:33 control: Client.Shutdown done.
tailscale | 2026/02/09 12:54:33 control: doLogin(regen=false, hasUrl=false)
tailscale | 2026/02/09 12:54:33 control: control server key from https://controlplane.tailscale.com: ts2021=[fSeS+], le
gacy=[nlFWp]
tailscale | 2026/02/09 12:54:33 control: RegisterReq: onode= node=[tDr/a] fup=false nks=false
tailscale | 2026/02/09 12:54:34 control: RegisterReq: got response; nodeKeyExpired=false, machineAuthorized=false; auth
URL=false
tailscale | 2026/02/09 12:54:34 health(warnable=login-state): error: You are logged out. The last login error was: inva
lid key: API key does not exist
观察到docker日志, 应该说login失败, API key的故障
核对网站上的信息 和 Keys, 发现之前的auth key已经被删除(应该是过期自动清理了)

尝试生成一个超过3个月的key, Pending valification
Generated new key

Be sure to copy your new key below. It won’t be shown in full again.
1 | tskey-auth-kqQbFMa******* |
This key will expire on May 10, 2026. If youʼll then want to continue using an auth key, youʼll need to generate a new one.
- 更新了key以后, nano docker-compose.yaml 把新的key更新到TS_AUTH_KEY中
- 重启当前Tailscale的docker-compose, 日志显示正常无错误, 再打开手机客户端可以看到另外的一个节点docker和手机客户端,
- 这时手机端可以设置EXIT NODE为docker, 完成数据流量流转
灵感来源
https://www.ioiox.com/archives/143.html
https://github.com/wg-easy/wg-easy
https://www.wireguard.com/install/
